Table of Contents
ToggleThe roaring twenties brought more than jazz and flappers, it revolutionized interior design with bold geometric patterns, luxurious materials, and a shift toward modern plumbing. A 1920s-inspired bathroom marries vintage charm with surprisingly functional design principles that still hold up a century later. Whether renovating an original period home or adding character to a newer build, capturing this era’s aesthetic requires attention to specific fixtures, tile work, and color schemes. This isn’t about creating a museum piece, it’s about translating Art Deco elegance into a bathroom that works for today’s homeowner while honoring the craftsmanship of the Jazz Age.
Key Takeaways
- 1920s bathroom design emphasizes geometric precision, black-and-white contrast, and visible chrome plumbing that celebrates modern functionality as a design feature.
- Pedestal sinks, freestanding cast-iron tubs, and hexagonal floor tile are signature fixtures that define authentic 1920s bathroom style and make small spaces feel more spacious.
- Proper substrate preparation with cement board or modern waterproofing membranes is critical beneath tile work; cutting costs here leads to cracked grout and eventual subfloor rot.
- Sconce lighting flanking mirrors at 60-66 inches from the floor and Art Deco-inspired geometric fixtures create authentic illumination while avoiding anachronistic recessed can lights.
- Invest budget in quality fixtures and professional tile installation rather than spreading resources across accessories; a well-executed pedestal sink and hex floor outweigh numerous period-hint decorations.
- Pastel-colored fixtures from the late 1920s (soft pink, mint green, pale yellow) offer sophistication when sourced carefully, but require inspection for crazing and verification of dimensions before purchase.
Defining Features of 1920s Bathroom Style
The 1920s bathroom marked a transition from purely utilitarian spaces to rooms with genuine design ambition. Several signature elements distinguish this era from what came before and after.
Geometric precision defines the period. Where Victorian bathrooms favored ornate curves and florals, the twenties embraced sharp angles, stepped forms, and repeating patterns borrowed from Art Deco architecture. Think chevrons, hexagons, and parallel lines rather than organic shapes.
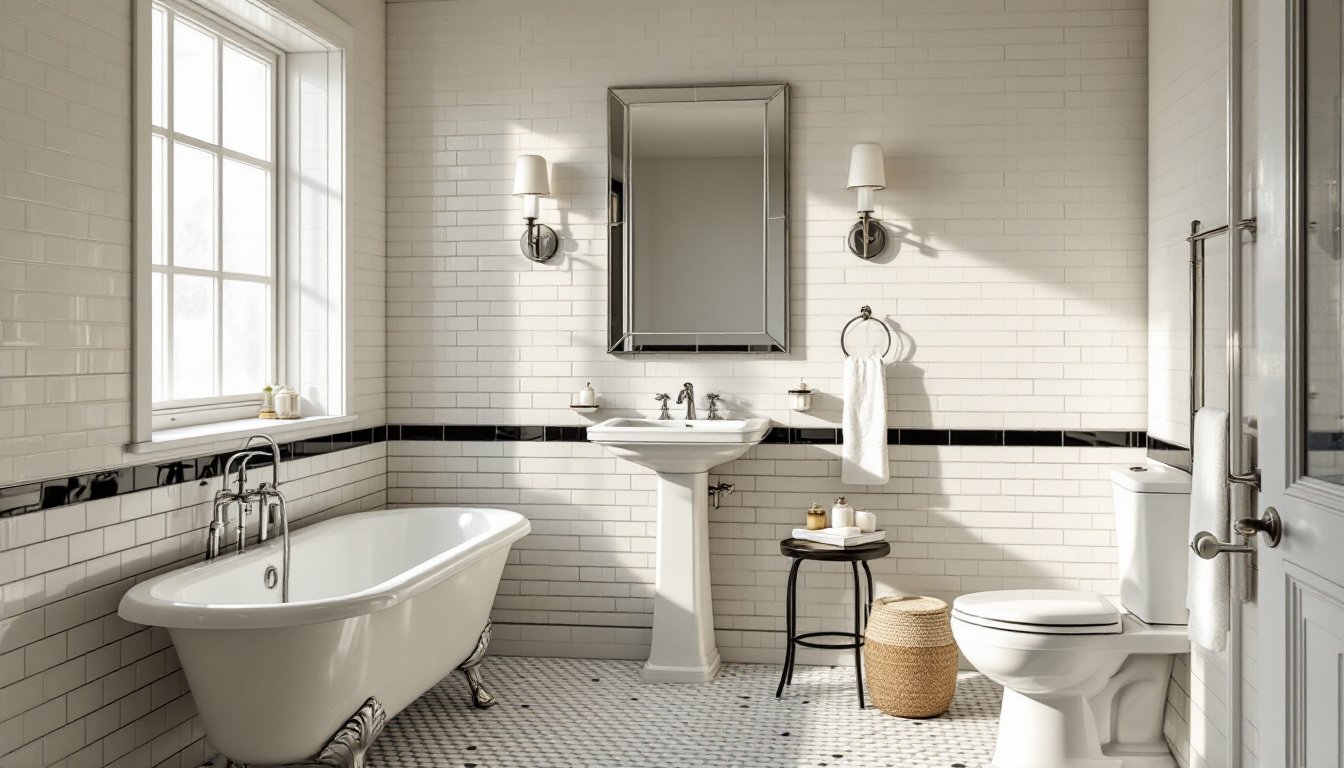
Black and white contrast dominated color schemes, often executed in tile work that created striking visual impact. This wasn’t about minimalism, it was about drama through simplicity. Homeowners paired crisp white fixtures with black accents in flooring, wainscoting, or trim.
Visible plumbing became a design feature rather than something to hide. Chrome-plated exposed pipes, wall-mounted faucets, and cross-handle valves showcased the modern marvel of indoor plumbing. The industrial elements got polished to a shine and treated as jewelry for the room.
Built-in storage started appearing as designers recognized bathrooms needed more than a sink and tub. Medicine cabinets with beveled mirror fronts, recessed niches with glass shelving, and small linen closets became standard in better homes.
The scale leaned compact by today’s standards. A typical 1920s bathroom might measure 5×7 feet, with efficient layouts that placed fixtures along one or two walls. Working within these proportions when renovating helps maintain authentic character.
Color Palettes That Capture the Jazz Age
While black-and-white schemes get most of the attention, the 1920s bathroom palette included several sophisticated color stories that bring warmth without sacrificing period accuracy.
Classic monochrome remains the safest choice. Use white subway tile for the majority of surfaces, then introduce black in hexagonal floor tile, border strips, or a wainscot band at 36-42 inches. The high contrast reads as timeless rather than trendy.
Pastel fixtures emerged in the late twenties as colored porcelain became more affordable. Soft pink, mint green, and pale yellow sinks and tubs appeared in upscale homes. If sourcing vintage colored fixtures, inspect carefully for crazing (fine cracks in the glaze) and verify measurements, old tubs often run smaller than modern 60-inch standards.
Metallic accents in chrome, nickel, or brass added glamour without overwhelming small spaces. Chrome became the finish of choice as it symbolized modern manufacturing. Polished nickel offers a slightly warmer tone that hides water spots better in hard-water areas.
Deep jewel tones showed up in tilework as accent colors. Emerald green, sapphire blue, or deep burgundy might appear in a border pattern or as small decorative inserts within white field tile. These pops of color prevent the space from feeling clinical.
Paint colors for walls above wainscoting typically stayed neutral, cream, soft gray, or very pale versions of the accent colors used in tile. The goal was to let the fixtures and tilework command attention rather than competing with bold wall colors. When planning a restoration, experienced contractors featured on platforms like This Old House often stress matching existing tile colors before committing to new paint selections.
Fixtures and Hardware with Vintage Character
Pedestal Sinks and Freestanding Tubs
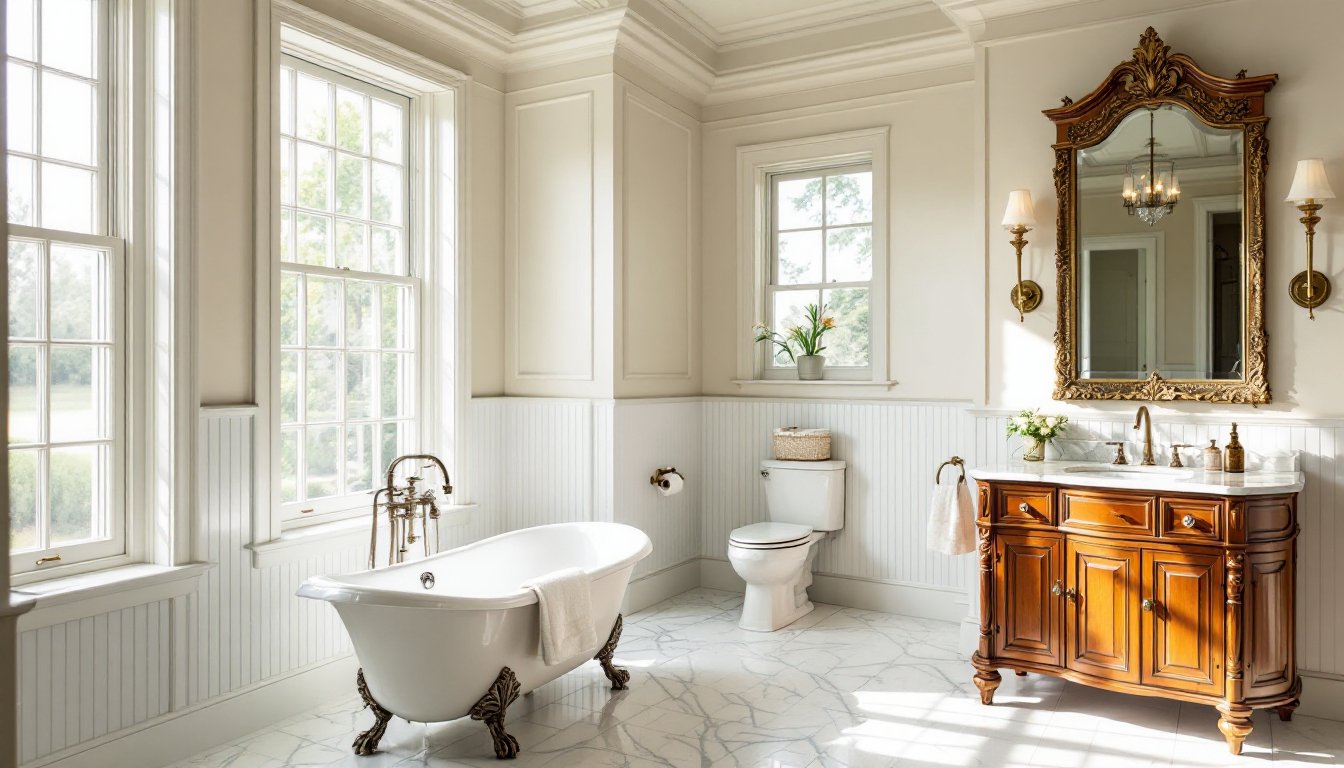
The pedestal sink became the era’s signature fixture, replacing wall-hung basins and heavy wooden vanities. These sinks elevate the basin on a glazed column that hides the drain while keeping the floor visible, a design that makes small bathrooms feel more spacious.
When sourcing pedestal sinks, verify both the basin width (typically 20-24 inches) and the pedestal height. Vintage units often sit lower than modern ADA-compliant heights of 34 inches. Reproduction models from manufacturers like Kohler’s Memoirs or American Standard’s Retrospect lines offer period styling with current plumbing standards and faucet spacing.
Freestanding tubs with claw feet or pedestal bases dominated this period, though built-in alcove tubs with apron fronts gained popularity in smaller homes. Cast iron construction was standard, these tubs weigh 300-400 pounds empty and require proper floor support. Check joist spacing and condition before installing: most need 16-inch on-center joists rated for the combined weight of tub, water (roughly 60 pounds per cubic foot), and bather.
Refinishing vintage cast iron beats buying new for authenticity, but expect to pay $400-600 for professional reglazing. DIY epoxy kits exist but rarely hold up to daily use for more than 3-5 years.
Period-Appropriate Faucets and Accessories
Widespread faucets with separate hot and cold handles mounted on 8-inch centers became standard. Cross handles or porcelain cap handles with “Hot” and “Cold” markings deliver the right look. Wall-mounted tub fillers with exposed supply lines make a strong visual statement, though they require running pipes through the wall, not a trivial retrofit in existing construction.
Accessories should feel substantial. Look for chrome towel bars with ball-end mounting posts, glass shelves with nickel brackets, and soap dishes made from porcelain or chrome-plated brass rather than plastic. The 1920s valued permanence in materials.
Toilets from this era typically featured wall-mounted tanks connected to the bowl by an exposed flush pipe. True vintage models are harder to source and often fail modern water efficiency standards (they used 5-7 gallons per flush versus today’s 1.6-gallon maximum). Reproduction high-tank toilets offer the aesthetic with compliant internals.
Tile Patterns and Flooring Choices
Tile work defines the 1920s bathroom more than any other element. Getting the pattern and installation right separates authentic restorations from superficial attempts.
Hexagonal floor tile in white or black remains the most recognizable pattern. These tiles typically measure 1 inch across (though 2-inch hex also appeared). Installing true 1-inch hex is labor-intensive, expect $12-18 per square foot for professional installation versus $6-10 for larger formats. Small tiles require more cuts, more grout lines, and more time.
When renovating farmhouses or historic homes, designers often reference successful 1920s-inspired bathroom projects that balanced authenticity with modern waterproofing requirements.
Subway tile covered walls, typically in a running bond pattern (tiles offset by half their length). Standard subway tiles measure 3×6 inches with a slight beveled edge. Stack them to wainscot height or run them full-height in shower areas. White remains most common, but pale pastels add subtle color.
Create visual interest with border treatments, a single row of black tile at the top of white wainscoting, or a band of smaller tiles (like 1×2-inch brick patterns) to break up large expanses. Listello borders with Art Deco geometric patterns work if they’re not too ornate.
Basketweave patterns using rectangular tiles create classic floors with more visual texture than hex. These alternate horizontal and vertical tile orientations to mimic woven fabric.
Under any tile floor, proper substrate preparation matters more than the tile itself. In a bathroom, this means cement board or a modern waterproofing membrane system (not just plywood and tar paper). Penny-pinching on the underlayment leads to cracked grout, loose tiles, and eventual subfloor rot. Budget $3-5 per square foot just for proper substrate work before tile costs.
Lighting and Decorative Accents
Period lighting fixtures and thoughtful accents complete the transformation from generic bathroom to Jazz Age retreat.
Sconce lighting flanking the mirror provides the most authentic illumination. Look for fixtures with geometric chrome frames, frosted glass shades in cylindrical or globe shapes, or Art Deco sunburst patterns. Mount them at 60-66 inches from the floor (roughly eye level for most users) and 36-40 inches apart for balanced lighting.
Avoid recessed can lights, they’re anachronistic and harsh. If ambient lighting is needed, a flush-mount ceiling fixture with a geometric glass shade works better. For renovation inspiration, browsing design platforms like Homify reveals how contemporary designers adapt vintage lighting strategies to meet current electrical codes.
Medicine cabinets with beveled mirrors and chrome frames add storage without visible clutter. Recessed models work best in walls built with 2×4 studs (3.5-inch cavity depth), though surface-mounted versions suit thinner walls or tile-backed surfaces where cutting in isn’t practical.
Window treatments should be minimal. Frosted glass, textured glass blocks, or simple roller shades in white or cream maintain privacy without heavy curtains. If the bathroom has a window with good bones, consider leaving it uncovered if privacy allows.
Decorative touches might include a small chrome stool or bench, a wall-mounted chrome razor holder, or vintage apothecary jars for cotton balls and swabs. Keep accessories functional, the 1920s aesthetic valued purposeful objects over pure decoration.
Mirrors deserve special attention. A large rectangular mirror with beveled edges and chrome mounting clips captures the era perfectly. Avoid ornate gilded frames or rustic wood, they read as wrong-period.
For flooring transitions, use marble or hex tile thresholds rather than modern metal T-molding. The threshold should sit flush with adjacent flooring to prevent tripping hazards while maintaining visual continuity.
Creating an authentic 1920s bathroom requires balancing historical accuracy with building codes, modern plumbing standards, and waterproofing technology. Focus budget on quality fixtures and proper tile installation rather than spreading resources thin across too many elements. A well-executed pedestal sink and hex floor outweigh a dozen small accessories that merely hint at the period.