Table of Contents
ToggleAdding deck stairs transforms an elevated outdoor space from an isolated platform into a seamless extension of the yard. But when the drop exceeds three or four feet, or when the stairs need to change direction, a well-planned landing becomes essential, not just for code compliance, but for safe, comfortable navigation. Landing design isn’t complicated, but it does require attention to structural support, dimensional accuracy, and local building regulations. This guide walks through the planning, code requirements, and construction methods needed to build a deck stair landing that’s both sturdy and visually cohesive with the rest of the project.
Key Takeaways
- A deck stair landing design becomes essential when the vertical rise exceeds 12 feet or stairs change direction by more than 30 degrees, improving both safety and code compliance.
- Landing dimensions should include a 36-inch minimum width (48 inches for comfort), depth equal to stair width, and must support additional live loads through proper footings below the frost line.
- The formula 2 × riser + tread = 24 to 25 inches ensures comfortable proportions, with risers typically 7 to 7.75 inches and consistent within 3/8 inch across the entire flight.
- Elevated landings require independent post and footing systems, while ground-level landing pads using concrete or compacted gravel eliminate wood-to-ground contact and reduce long-term rot risk.
- Handrails must be continuous across landings and meet graspable diameter standards (1.25 to 2 inches), with guardrails required on landings more than 30 inches above grade.
- Visual cohesion with your main deck through matching decking materials, railing styles, and finishes transforms deck stair landing design into an integrated, attractive outdoor extension.
Why Add a Landing to Your Deck Stairs?
A landing serves several practical purposes. First, it breaks up long descents into manageable segments, reducing fatigue and improving safety, especially important for children, elderly users, or anyone carrying items up and down. Second, landings allow stairs to change direction, useful when working around property lines, landscaping features, or utility easements.
From a structural standpoint, landings distribute loads more evenly and provide stable attachment points for stringer runs. They also simplify stringer calculations: instead of one long flight with complicated math, builders work with shorter, standard runs.
Code-wise, most jurisdictions require a landing when the vertical rise exceeds a certain height (often 12 feet) or when stairs change direction by more than 30 degrees. Even when not strictly required, landings improve usability and long-term durability.
Essential Design Considerations for Deck Stair Landing Configurations
Designing a landing starts with understanding the total rise, the vertical distance from the deck surface to grade. Divide this by the desired riser height (typically 7 to 7.75 inches) to determine the number of treads needed. If that number exceeds 12 to 14 steps, plan for a mid-flight landing.
Landing dimensions matter. A 36-inch minimum width matches standard stair width and meets most codes, but 48 inches feels more comfortable and accommodates furniture or planters. Depth should equal at least the width of the stairway: 36 to 48 inches is standard.
Consider orientation: will the landing serve as a straight pass-through, or will it turn the stair run 90 or 180 degrees? Turnarounds require more square footage but reduce the stairway’s footprint in one direction, helpful on narrow lots.
Building Code Requirements and Safety Standards
The International Residential Code (IRC) sets baseline standards, but local amendments vary. Key code points include:
- Maximum riser height: Typically 7.75 inches: must be consistent within 3/8 inch across the entire flight.
- Minimum tread depth: Usually 10 inches (measured horizontally, excluding nosing).
- Landing width: Must equal or exceed stair width.
- Landing depth (direction of travel): Minimum 36 inches.
- Handrails: Required on one side for stairs with four or more risers: both sides for stairs wider than 44 inches. Handrails must be continuous across landings.
- Guardrails: Required on landings more than 30 inches above grade, with maximum spacing of 4 inches between balusters.
Always verify local codes before finalizing plans. Some municipalities require permits and inspections for any stairs exceeding three risers or landings above a certain height.
Popular Deck Stair Landing Configurations
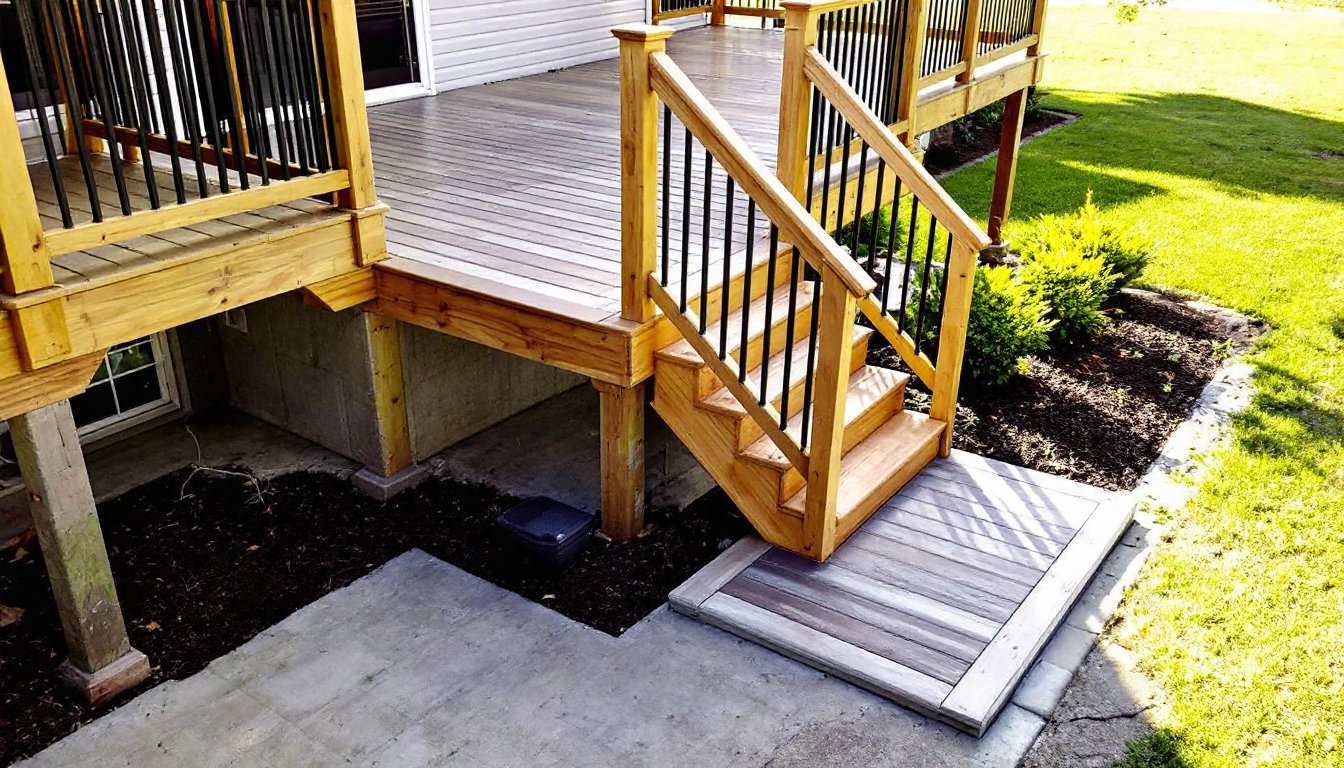
Straight-run with mid-landing: The simplest layout. Stairs descend in a single direction, pausing at a landing halfway down. This works well for moderate elevations and open yards. Framing is straightforward: the landing acts like a small, low deck supported by posts and beams.
L-shaped (90-degree turn): Stairs descend from the deck, meet a landing, then turn left or right for the final run to grade. This configuration saves linear space and can direct foot traffic away from landscaping or toward a path. Framing requires diagonal bracing and careful post placement to handle multi-directional loads.
U-shaped (180-degree switchback): Stairs descend, hit a landing, then reverse direction. Common for tall decks or when building codes limit continuous runs. This layout requires the most square footage for the landing platform but keeps the stairway compact in plan view.
Ground-level landing pad: Not elevated: instead, a concrete pad or compacted gravel base at grade supports the bottom of the stringers. This isn’t a code-required landing in most cases, but it’s essential for long-term stability. Some builders use ground-level construction techniques to ensure proper drainage and stringer attachment.
Materials and Construction Methods for Durable Landings
Framing lumber: Use pressure-treated Southern Yellow Pine or #2 grade or better Douglas fir for joists, beams, and posts. Joist spacing should match the deck, typically 16 inches on center for standard decking.
Posts and footings: Landings require their own foundation. Dig footings below the frost line (depth varies by region: check local codes) and set 6×6 posts or doubled 4x4s in concrete. Use adjustable post bases to simplify leveling. For elevated landings, posts should be plumb and braced diagonally until the framing is complete.
Decking material: Match the deck surface for visual continuity. Pressure-treated boards, composite decking, or PVC planks all work. If using wood, ensure proper spacing (1/8 to 1/4 inch) for drainage and expansion.
Fasteners: Exterior-grade screws or hidden fastener systems prevent surface rust and splitting. Joist hangers, post caps, and angle brackets should be hot-dipped galvanized or stainless steel to resist corrosion.
Alternative materials: For ground-level landings, consider a poured concrete pad (minimum 4 inches thick, reinforced with #4 rebar or wire mesh) or a compacted gravel base topped with pavers. These eliminate wood-to-ground contact and reduce rot risk. Many experienced DIYers reference plans from sources like Ana White for framing techniques, though deck-specific engineering is often required.
Step-by-Step Planning for Your Deck Stair Landing Project
-
Measure total rise and run. Use a level and tape measure to determine vertical drop and available horizontal space. Sketch the layout to scale.
-
Calculate riser and tread dimensions. Divide total rise by desired riser height: adjust until you get whole numbers and consistent dimensions. Use the formula: 2 × riser + tread = 24 to 25 inches for comfortable proportions.
-
Determine landing location. For mid-flight landings, aim to split the total rise evenly. For directional changes, position the landing where the turn naturally fits the site.
-
Design the landing frame. Lay out joists, beams, and posts on paper. Ensure the landing can support live loads (typically 40 pounds per square foot for residential decks, though stairs may see higher dynamic loads).
-
Submit plans for permit review. Include a site plan, framing diagram, and railing details. Some jurisdictions require stamped drawings from a licensed engineer for tall or complex landings.
-
Excavate and pour footings. Dig below frost line, set sonotube forms, and pour concrete. Install post anchors while the concrete is wet.
-
Erect posts and beams. Plumb and brace posts, then attach beams with through-bolts or post caps. Check for level.
-
Install joists and decking. Hang joists with galvanized hangers, then fasten decking perpendicular to joists. Maintain consistent spacing.
-
Attach stringers. Cut stringers to match riser/tread layout, then fasten to the deck and landing using structural connectors, not just toenailed screws. Builders often consult resources like Fix This Build That for jig setups and cutting techniques.
-
Add railings and guardrails. Install posts, infill balusters, and top rails per code. Handrails must be graspable (1.25 to 2 inches in diameter) and mounted 34 to 38 inches above the nosing.
Enhancing Your Landing with Style and Function
Once the structure is sound, small details make a big difference. Tread nosing (the overhang beyond the riser) improves foot clearance and adds a finished look: 1 to 1.5 inches is typical. Lighting is both practical and atmospheric, install low-voltage LED step lights on risers or landing perimeter for nighttime safety.
Railing style can echo the deck’s aesthetic. Cable rail systems offer clean, modern lines: traditional wood balusters suit craftsman or farmhouse designs. Metal balusters (aluminum or powder-coated steel) split the difference and require less maintenance.
Paint or stain the landing to match, or contrast with, the main deck. Solid stains hide imperfections in pressure-treated lumber: semi-transparent stains showcase wood grain. Use products rated for horizontal surfaces and high foot traffic.
Consider adding built-in planters or bench seating on larger landings. These features turn a transition space into a destination, ideal for enjoying a view or setting down groceries. Just ensure any additions don’t obstruct the required clear width or create tripping hazards.
A well-designed deck stair landing blends engineering precision with thoughtful aesthetics. It’s worth taking the time to get dimensions, materials, and code compliance right. The result is a structure that’s safe, durable, and genuinely enjoyable to use, year after year.