Table of Contents
ToggleA bathroom vanity isn’t just a sink with storage underneath, it’s the centerpiece that sets the tone for the entire room. Whether you’re tackling a full bathroom remodel or swapping out a dated builder-grade unit, the right vanity design balances aesthetics, functionality, and durability. From choosing the correct dimensions to selecting materials that can withstand daily splashes and humidity, every decision impacts how well your bathroom works for you. This guide walks through the essential elements of bathroom vanity design, covering sizing, style, materials, storage, and lighting to help you create a space that looks sharp and performs even better.
Key Takeaways
- Bathroom vanity design must balance dimensions, materials, and style—measure twice and account for door clearance, plumbing access, and IRC accessibility standards.
- Choose durable countertop materials like quartz (non-porous and low-maintenance) or granite, and prioritize plywood cabinet construction with soft-close hardware for moisture resistance.
- Proper lighting is essential; mount sconces 36 to 40 inches apart at eye level (60 to 65 inches from the floor) and use warm white LED bulbs (2700K–3000K) to avoid shadows during grooming.
- Select vanity style deliberately—modern minimalism, transitional, or classic designs each interact differently with your tile, fixtures, and wall colors; white, gray, and natural wood tones remain most adaptable long-term.
- Maximize storage with drawer dividers, pull-out shelves, and vertical solutions like tower units, and ensure any in-drawer electrical outlets are GFCI-protected per NEC code requirements.
- Match mirror size proportionally to your vanity and sinks, and coordinate mirror frames, light fixture finishes, and hardware across the space to create a cohesive, intentional aesthetic.
Choosing the Right Vanity Size and Layout for Your Bathroom
The first rule of vanity sizing: measure twice, order once. A vanity that’s too large overwhelms a small powder room, while an undersized unit in a master bath looks out of place and wastes usable counter space.
Standard vanity depths run 18 to 21 inches, but modern designs often push to 22 or 24 inches to accommodate vessel sinks or deeper drawers. Width varies widely, 24 to 30 inches for powder rooms, 36 to 48 inches for guest baths, and 60 to 72 inches (or double vanities at 72+ inches) for primary bathrooms. Always account for door swing clearance and plumbing access panels if your vanity backs up to a tub or shower.
For tight spaces, a wall-mounted or floating vanity opens up floor area and makes cleaning easier. These require solid blocking between studs during installation, typically 2×6 or 2×8 blocking secured to at least two studs to support the weight of the cabinet, countertop, and daily use. If you’re retrofitting, you may need to open the wall to add blocking, which turns a simple swap into a more involved project.
Single-sink vs. double-sink layouts depend on bathroom traffic and available square footage. Double vanities require at least 60 inches of width (72 inches is more comfortable) and adequate plumbing rough-ins for two drain and supply lines. If you’re adding a second sink to an existing single-vanity layout, you’ll need to run new drain and vent lines, work that often requires a permit and may be best left to a licensed plumber to ensure code compliance with the International Plumbing Code (IPC).
Leave at least 15 inches of clearance from the vanity’s centerline to any side wall or obstruction, and 30 inches of clear floor space in front for comfortable use. These aren’t just design suggestions, they’re rooted in IRC (International Residential Code) accessibility and safety standards.
Popular Vanity Styles: From Modern Minimalism to Classic Elegance
Vanity style sets the visual direction for the entire bathroom. Mismatched styles clash with your tile, fixtures, and lighting, so choose deliberately.
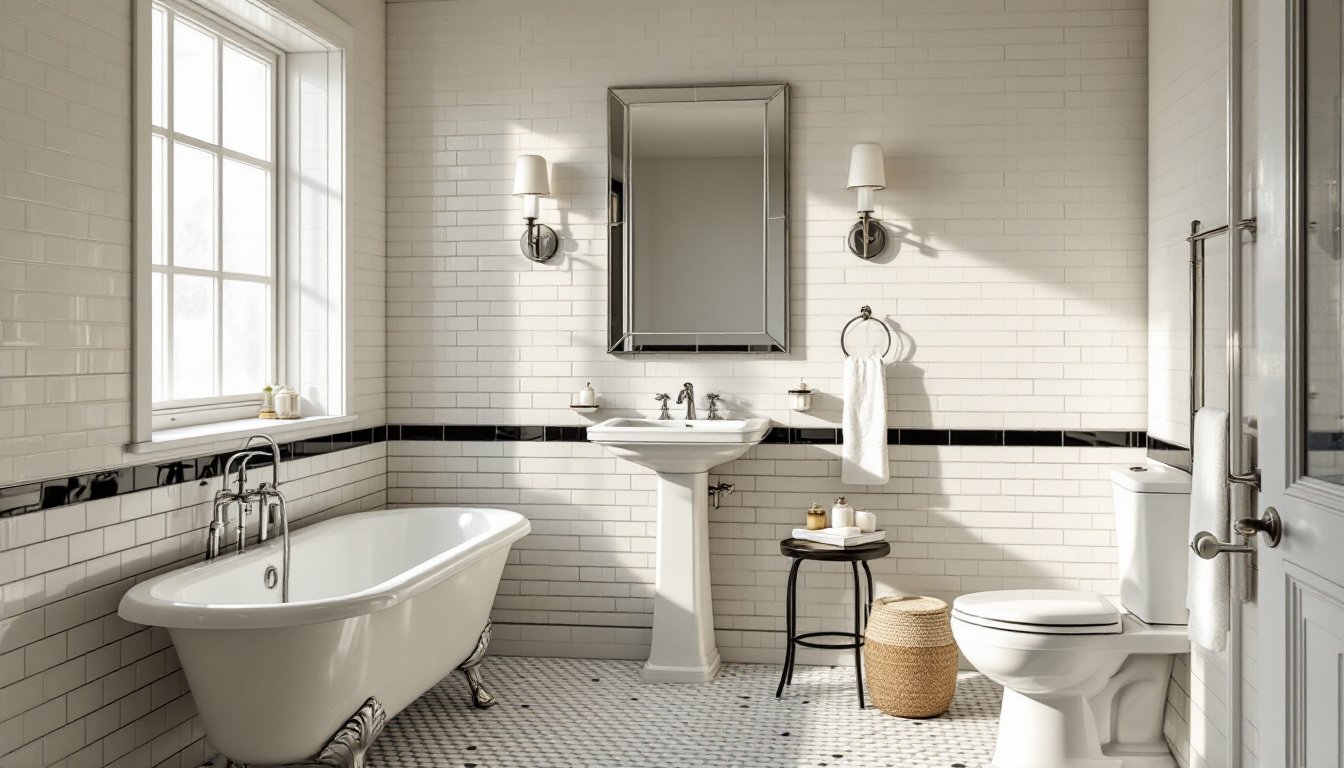
Modern and contemporary vanities emphasize clean lines, flat-panel or slab doors, and integrated or undermount sinks. Finishes lean toward matte black, brushed nickel, or natural wood tones. Floating vanities are common in this category, creating a sleek, uncluttered look. These work especially well in smaller bathrooms where visual breathing room matters.
Transitional vanities blend traditional detailing with modern restraint, think Shaker-style doors, simple hardware, and neutral colors. They’re versatile enough to bridge vintage tile with contemporary fixtures, making them a safe pick for resale-focused renovations.
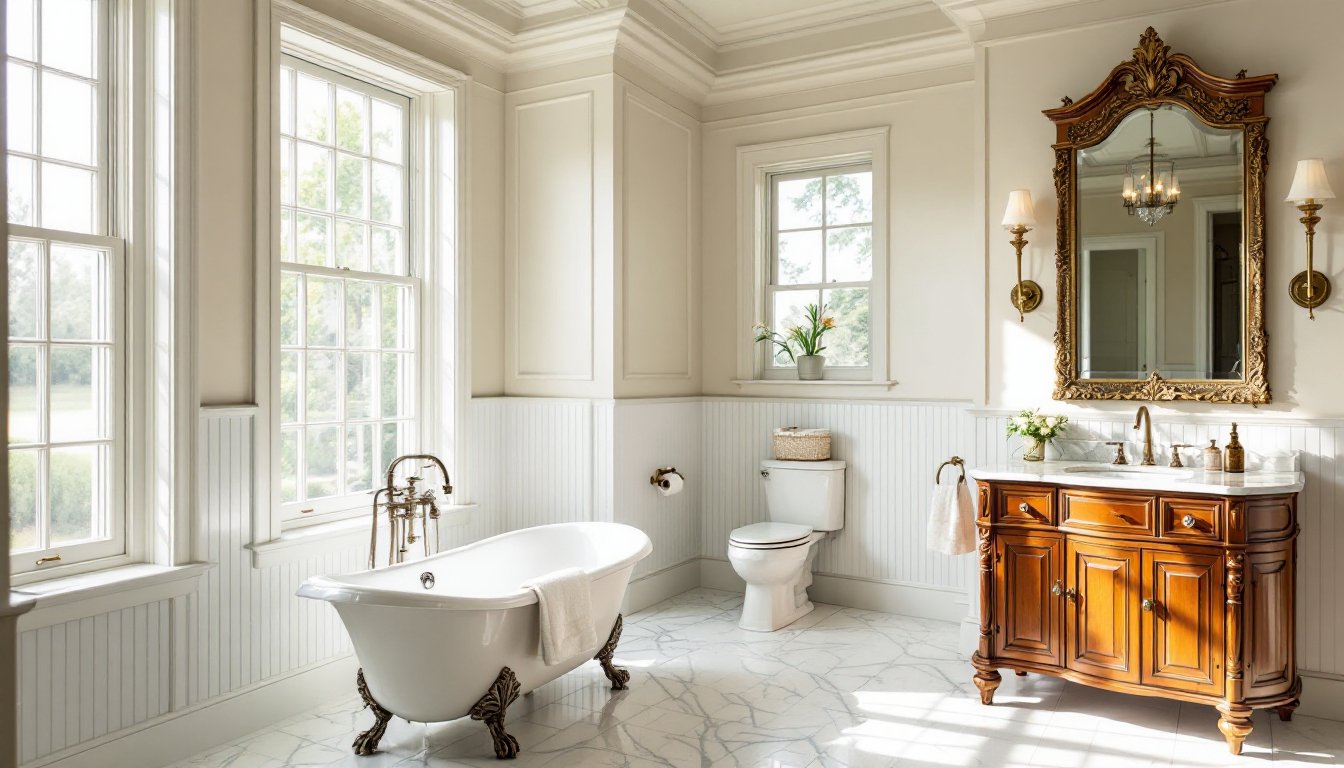
Classic and traditional styles feature raised-panel doors, ornate hardware (oil-rubbed bronze, polished brass), furniture-like legs, and often a wood-stained finish. Many incorporate freestanding furniture vanities that look like repurposed antique dressers. These require more floor space and don’t seal tightly to the floor, so water resistance and regular cleaning behind the legs are essential.
Farmhouse or rustic vanities use reclaimed wood, open shelving, and vessel or apron-front sinks. They bring warmth and texture but sacrifice some moisture protection, unsealed wood needs periodic resealing with a water-resistant finish to prevent warping or mold growth.
When browsing interior design ideas, pay attention to how vanity style interacts with wall color, tile pattern, and lighting. A bold, colorful vanity can anchor a neutral room, but it also limits your flexibility if you want to change the palette later. White, gray, and natural wood tones remain the most adaptable long-term.
Selecting Materials and Finishes That Last
Bathrooms are hostile environments for furniture, humidity, splashes, cleaning chemicals, and heat cycling take a toll. Choose materials that can handle it.
Countertop Options
Quartz is the workhorse of bathroom counters. It’s non-porous, resists staining and bacteria, and doesn’t require sealing. Expect to pay $60 to $120 per square foot installed, depending on edge profile and slab selection. Quartz handles daily moisture without issue, but avoid setting hot tools directly on the surface, heat can discolor the resin binder.
Granite offers natural beauty and durability but requires annual sealing to prevent water penetration and staining. Pricing is comparable to quartz, and professional fabrication is necessary for cutouts and edges.
Marble is a classic choice for high-end bathrooms, but it’s softer and more porous than quartz or granite. It etches from acidic cleaners (even some common bathroom sprays) and stains easily. If you go with marble, plan to reseal it every six months and baby it.
Solid-surface materials like Corian are repairable and seamless, making them a good mid-range option. They scratch more easily than stone but can be sanded and refinished. Pricing runs $40 to $80 per square foot installed.
Laminate and tile are budget-friendly but less durable. Laminate edges can swell if water seeps in, and tile grout lines require regular sealing and cleaning to prevent mildew.
Cabinet Construction and Hardware
Plywood construction beats particleboard or MDF in bathrooms. Plywood resists moisture damage better and holds screws more securely for hinges and drawer slides. Check the cabinet interior, ½-inch plywood backs and shelves indicate a higher-quality build.
Finish and seal matter as much as material. Avoid unfinished interiors, especially in base cabinets where plumbing leaks can happen. A factory-applied catalyzed conversion varnish or waterborne urethane offers better moisture resistance than simple paint or stain.
Soft-close hinges and drawer slides aren’t just luxury, they extend cabinet life by reducing impact stress. Full-extension undermount slides make it easier to access items in the back of deep drawers and support heavier loads than side-mounted options.
Choose solid brass or stainless steel hardware over zinc alloy, which can corrode in humid environments. If you’re after a specific finish (matte black, brushed gold), verify it’s PVD-coated for durability, cheaper finishes wear off quickly with regular handling.
Storage Solutions and Organizational Features
A beautiful vanity that doesn’t store your daily essentials is just expensive furniture. Plan storage around how you actually use the bathroom.
Drawer dividers and inserts keep small items from becoming a tangled mess. Look for adjustable or modular divider systems that can adapt as your needs change. Many vanities now include shallow top drawers with built-in organizers for cosmetics, razors, and toothbrushes.
Pull-out shelves and trays in lower cabinets make it easier to reach cleaning supplies, spare towels, and bulk products without crouching and digging. If you’re building a custom vanity, consider a pull-out hamper or tilt-out tray at the top rail for frequently used items.
Open shelving under a floating vanity or beside a freestanding unit offers quick access to towels and decorative baskets but requires tidiness. Dust and humidity can discolor exposed items, so rotate stock regularly.
For shared bathrooms, divided drawer systems or separate cabinet zones reduce morning traffic jams. A double-sink vanity with a center drawer stack gives each person dedicated storage while maximizing counter space between sinks.
If your vanity design includes electrical outlets inside drawers for hair tools, make sure they’re GFCI-protected and installed by a licensed electrician per NEC Article 210.8 (receptacles in bathrooms require GFCI protection). In-drawer outlets keep counters clear but need proper ventilation to prevent heat buildup.
Don’t forget vertical storage, side cabinets, tower units, or a tall linen cabinet flanking the vanity put unused wall height to work. These are especially useful in bathrooms with limited under-sink depth due to plumbing constraints.
Lighting and Mirror Pairings That Elevate Your Vanity Design
A stunning vanity can look flat and uninviting without proper lighting. Task lighting at the vanity is non-negotiable, overhead fixtures alone create shadows on faces, making daily grooming tasks difficult.
Sconce placement is the gold standard. Mount a pair of sconces 36 to 40 inches apart, centered at about 60 to 65 inches from the floor (or roughly eye level). This provides even, shadow-free illumination across the face. If your vanity is wider than 60 inches or has two sinks, consider four sconces, one on each side of each mirror.
Vanity light bars mounted above the mirror are a common alternative but work best when paired with side lighting or in powder rooms where grooming isn’t a primary task. For a light bar, aim for 75 to 80 inches above the finished floor, and choose fixtures with frosted or opal glass shades to diffuse the light and reduce glare.
LED vs. incandescent: LEDs are the practical choice for energy efficiency and longevity, but color temperature matters. Stick to 2700K to 3000K (warm white) for flattering skin tones, or go slightly higher to 3500K if you prefer a crisper, more neutral light. Avoid anything over 4000K in a bathroom, it skews too cool and clinical.
Dimmer switches give you flexibility for different times of day and moods. Make sure your LED bulbs or fixtures are labeled dimmable, not all are, and incompatible dimming causes flickering or buzzing. Install a CL-rated dimmer designed for LED/CFL loads.
Mirrors should be proportional to the vanity and sinks. A single large mirror over a double vanity creates a cohesive look, while two separate mirrors (one per sink) define individual zones. Typical mirror widths run 24 to 36 inches for single sinks and 30 to 40 inches per sink for doubles, leaving a few inches of clearance from sconces or walls.
Backlit or edge-lit mirrors integrate lighting directly into the mirror frame for a sleek, modern look. These require a dedicated electrical circuit and wall-mounted junction box, so plan the wiring during the rough-in phase if you’re building or remodeling. Many high-end bathroom remodel inspiration galleries feature these integrated designs.
For final polish, match mirror frames and light fixture finishes to cabinet hardware and plumbing fixtures (faucets, towel bars). Mixing metals can work, matte black faucets with brushed brass sconces, for example, but keep it intentional. Too many finishes in a small room read as disjointed rather than curated. When planning your bathroom’s overall aesthetic, reviewing home images for decor inspiration can help you see how professionals balance these elements in real spaces.