Table of Contents
ToggleTight square footage doesn’t mean giving up the idea of a home bar. A well-executed corner mini bar tucks neatly into unused real estate while adding serious personality and function to an apartment, condo, or compact home. The trick is working smarter with vertical space, layered storage, and intentional design choices that serve both form and function. Whether someone’s converting a forgotten nook or commandeering a dining room corner, the right approach transforms dead space into a highly practical entertaining zone, without the footprint of a full wet bar or the price tag of a custom build.
Key Takeaways
- Corner mini bar design transforms unused nook space into a functional entertaining zone by wrapping into the angle and preserving main traffic flow in small apartments and condos.
- A functional corner mini bar requires a prep surface (10–12 inches deep minimum), tiered bottle storage, accessible glassware organization, and essential tools like a jigger and bar shaker within arm’s reach.
- Vertical storage is critical for maximizing space—use floor-to-ceiling shelving, adjustable brackets, triangular corner shelves, and wall-mounted pegboard or rails to keep the footprint minimal.
- Budget-friendly DIY options range from floating shelf bars under $100 to built-in corner shelves under $200, all achievable with basic tools like a drill, level, and stud finder.
- Layer your lighting with under-shelf LED strips (warm white, $15–$25), pendant lights, and wall sconces to eliminate corner shadows and highlight your bar’s contents without overhead-only fixtures that flatten the space.
- Always anchor shelves and countertops directly into wall studs, not drywall anchors alone, since bottles and glassware can easily add 40–60 pounds per shelf and cause collapse.
Why Corner Mini Bars Are Perfect for Small Spaces
Corners are typically the last spots to get attention in floor plans. They’re awkward for furniture placement, often just holding a lonely plant or a pile of mail. But when retrofitted as a mini bar, they turn underutilized square footage into high-value territory.
A corner configuration naturally supports two-wall anchoring, which stabilizes shelving and countertops without requiring bulky freestanding furniture. This setup also creates a natural visual boundary, so the bar feels like its own defined zone rather than clutter wedged against a wall.
Space efficiency is the real win here. Where a standard bar cart or sideboard eats up 18–24 inches of linear wall space, a corner bar wraps into the angle, leaving the main traffic flow untouched. This works especially well in open-plan layouts where every square foot of walkway matters.
Finally, corner bars scale easily. A beginner can start with a single floating shelf and a pegboard: someone with more tools and ambition can build out tiered shelving, install a small wine rack, and add under-shelf lighting. The design grows with the skill level and the budget.
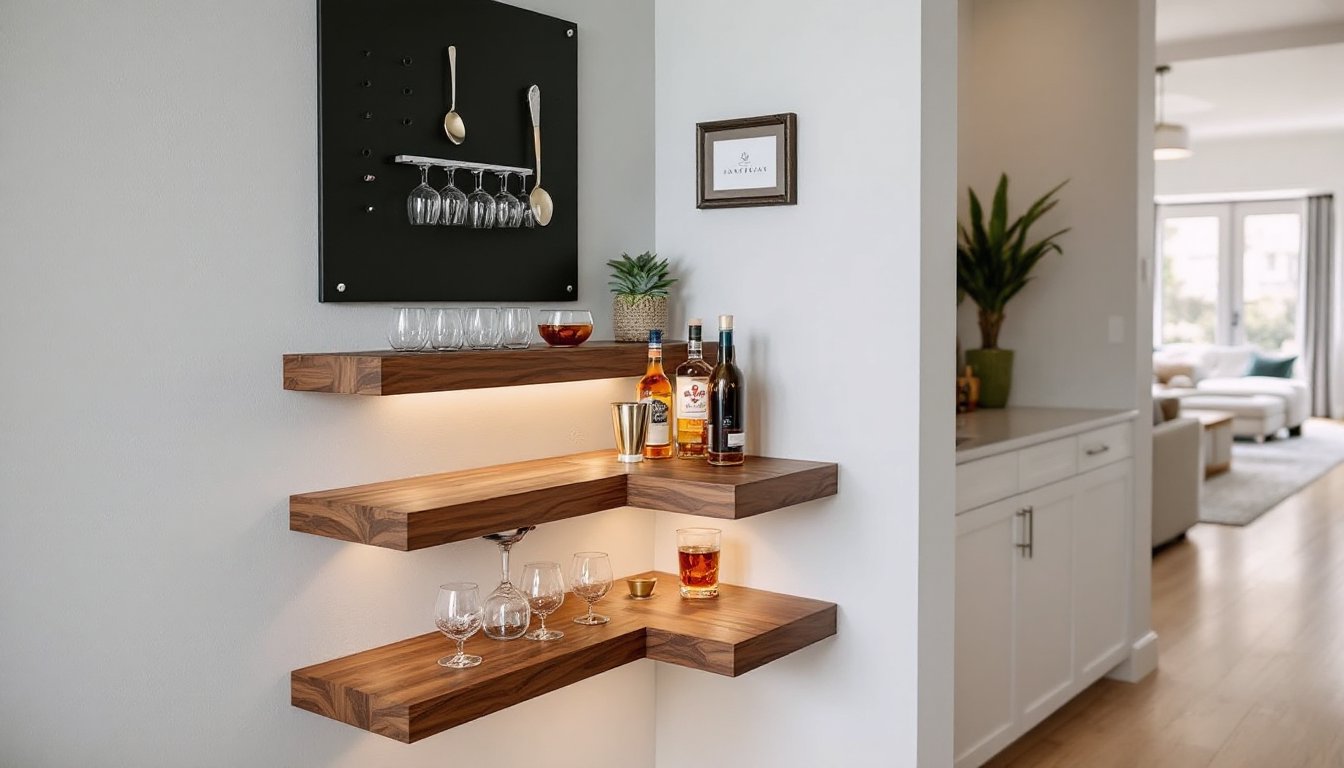
Essential Elements of a Functional Corner Mini Bar
A corner mini bar isn’t just a shelf with bottles on it. To actually function during use, it needs a work surface, accessible storage, and thoughtful organization.
Countertop or prep surface is non-negotiable. Even a narrow 10–12 inch deep shelf gives enough room to mix a drink, set down glassware, or stage garnishes. Materials matter here: sealed butcher block, laminate, or tile all handle spills better than raw wood. If mounting a floating counter, use heavy-duty bracket supports rated for at least 50 pounds per linear foot, bottles and glassware add up fast.
Glassware and bottle organization prevents the “dig through everything” problem. Stemware racks that mount under a shelf keep wine glasses accessible and free up counter space. Bottle storage works best when tiered or staggered so labels face forward. Avoid stacking bottles more than two deep unless they’re in a pull-out drawer: otherwise, grabbing the back row becomes a frustrating game of Jenga.
Accessible ice and bar tools complete the setup. A small insulated ice bucket lives on the counter. Bar tools, jigger, muddler, strainer, bottle opener, hang on hooks or sit in a countertop caddy. Magnetic knife strips work surprisingly well for holding metal bar tools against the wall, and they’re available at any kitchen supply store for under $15.
Storage Solutions That Maximize Every Inch
Vertical storage is the MVP in a corner bar. Start by going up: floor-to-ceiling shelving uses the full height of the wall and keeps the footprint minimal. Adjustable shelf brackets (like the heavy-duty steel standards from Knape & Vogt or Rubbermaid) let someone reconfigure shelf spacing as their collection changes.
Corner shelves can be triangular, L-shaped, or even lazy-susan style if there’s enough clearance. Triangular floating shelves are the easiest DIY install, just two brackets per shelf and basic 3/4-inch plywood or MDF cut to size. For a cleaner look, edge-band the plywood with iron-on veneer or paint all edges before mounting.
Don’t overlook hidden or dual-purpose storage. A narrow cabinet base (12 inches deep) can tuck under a floating counter and hold mixers, backup bottles, or bar napkins. Small pull-out drawers or slide-out trays make it easy to access items in the back without unloading the front. Wire slide-out organizers (sold in the kitchen section at home centers) fit perfectly in tight corners and cost around $20–$30.
Finally, use the wall behind the bar. Pegboard, slat wall, or even a simple rail system keeps frequently used items in reach and off the counter. This is where interior design ideas from resources like Apartment Therapy often highlight clever vertical hacks that translate well to bar setups.
Top Corner Mini Bar Design Styles for Compact Homes
Style dictates materials, finishes, and overall vibe. Luckily, corner bars adapt to nearly any aesthetic without requiring a ton of space.
Industrial: Open metal shelving (black pipe or powder-coated steel), reclaimed wood counters, and Edison bulb fixtures. This look is forgiving, slight imperfections in the wood or welds add character. Use 3/4-inch black iron pipe and floor flanges from the plumbing aisle to build custom shelving. Pair it with concrete-look laminate or actual poured concrete for the counter if skills allow.
Mid-century modern: Tapered wood legs, walnut or teak veneer, brass or gold hardware. Floating shelves with hidden brackets keep lines clean. A small bar cabinet with angled legs (think hairpin or splayed) anchors the corner without bulk. This style benefits from symmetry, so match shelf widths and keep spacing even.
Minimalist/Scandinavian: Light wood tones (birch, ash, white oak), white or light gray paint, minimal hardware. Everything should feel uncluttered. Limit decor to a single plant or a pair of matching decanters. Opt for handleless cabinets or push-to-open drawer mechanisms to maintain the sleek profile.
Farmhouse/rustic: Distressed wood, open shelving with decorative brackets (wrought iron or vintage-style), shiplap or beadboard backsplash. This style invites more texture and charm pieces, mason jar tumblers, galvanized metal buckets for ice, chalkboard signs. Just keep it from tipping into kitsch by limiting tchotchkes.
Glam/contemporary: High-gloss finishes, mirrored backsplashes, metallic accents (chrome, rose gold, brushed nickel), and LED strip lighting. Glass shelves on polished brackets create a floating effect. This look often shows up in design galleries on platforms like MyDomaine, where layered lighting and reflective surfaces amplify small spaces.
DIY Corner Mini Bar Ideas on a Budget
Building a corner bar from scratch doesn’t require a contractor or a four-figure budget. A few smart material choices and basic carpentry skills get most people 90% of the way there.
Option 1: Floating shelf bar (under $100). Buy two or three 24–30 inch floating shelf kits, stagger them up the corner walls in an L-shape, and finish with a coat of stain or paint. Add a small countertop bracket shelf at waist height (around 42 inches) for the work surface. Total materials: shelves, brackets, screws, and finish. Time: one afternoon. Tools needed: drill, level, stud finder.
Option 2: Repurposed furniture (under $150). A corner bookshelf unit or a narrow étagère (check thrift stores, Facebook Marketplace, or Craigslist) becomes a bar with minimal modification. Remove a shelf or two to fit taller bottles. Add a piece of 1/2-inch plywood cut to size as a custom tray or countertop insert. Paint or refinish to match the room. Attach a wine glass rack under the top shelf.
Option 3: Built-in corner shelves (under $200). Use 3/4-inch plywood or pine boards to build custom shelves that span the corner at 45-degree angles. Cut triangular or trapezoidal shelves, sand edges, and mount with L-brackets screwed into wall studs. Finish with polyurethane or paint. Add a peel-and-stick tile backsplash (available at big-box stores for around $1–$2 per square foot) for a polished look. This approach takes a weekend and requires a circular saw or miter saw, drill, and basic measuring skills.
For anyone wanting more detailed DIY home improvement techniques and creative material swaps, there’s no shortage of project breakdowns online that walk through each cut and fastener.
Pro tip: Anchor everything to studs. Drywall anchors are fine for lightweight decor, but a shelf loaded with bottles and glassware can pull right out of drywall. Use a stud finder, mark stud locations, and drive screws into solid wood framing.
Smart Lighting and Decor Tips to Elevate Your Corner Bar
Lighting transforms a corner bar from functional to impressive. Overhead ambient light rarely does the job, corners tend to fall into shadow, especially in the evening.
Under-shelf LED strip lighting is the easiest upgrade. Peel-and-stick LED strips (warm white, 2700–3000K) run about $15–$25 for a 6-foot roll and plug into any outlet. Mount them under the front lip of each shelf so they wash down over bottles and glassware. This creates depth and highlights the bar’s contents without glaring into anyone’s eyes.
Pendant lights or sconces add focused task lighting and visual interest. A single pendant hung at about 30–36 inches above the counter provides direct light for mixing drinks. Wall sconces flanking the corner (mounted at about 60–66 inches high) add ambient glow. Choose fixtures with dimmable bulbs for flexibility.
Avoid overhead-only lighting, which flattens the space and casts harsh shadows. Layered lighting, ambient, task, and accent, makes a small corner feel intentional and designed rather than tacked on.
For decor, less is more in a small footprint. A single piece of framed art, a small mirror to bounce light, or a narrow floating shelf with one or two curated objects (a cocktail recipe book, a vintage shaker) keeps it polished. Skip the clutter, every item on display should either be functional or genuinely meaningful.
Mirrors are particularly effective in tight corners. A frameless mirror panel behind the bar reflects light and visually doubles the space. Just make sure it’s securely mounted with mirror adhesive or J-channels, not just command strips.
Common Mistakes to Avoid When Designing Your Corner Mini Bar
Even a simple corner bar can go sideways if a few key details get overlooked.
Ignoring wall studs: Mounting shelves or countertops only into drywall anchors is asking for a collapse. Bottles are heavy. A full shelf can easily weigh 40–60 pounds. Always find studs with a stud finder and drive screws into solid framing.
Skipping a level: Shelves that aren’t level look sloppy and cause bottles to slide or tip. Use a 24-inch or 48-inch spirit level for every shelf install. Check level front-to-back and side-to-side.
Overlooking clearance: Don’t mount shelves so close together that a wine bottle won’t fit upright (most need at least 12 inches of vertical clearance). Measure bottle heights before finalizing shelf spacing. Adjustable brackets solve this problem by letting someone tweak spacing after install.
Choosing the wrong finish for high-contact surfaces: Unfinished wood or porous stone will stain from spills. Seal countertops with polyurethane (for wood) or a stone sealer (for tile or granite). Wipe up liquids promptly, but have a finish that can handle the occasional puddle.
Overloading with decor: A corner bar in a small space needs to stay functional. Too many decorative objects crowd the work surface and make the bar harder to use. Stick to a tight edit: glassware, bottles, tools, and one or two accent pieces max.
Forgetting about electrical access: If adding lighting, plan cord routing early. Running an extension cord across the wall looks messy. If possible, install an outlet inside the corner or use battery-powered LED strips. For hardwired lighting, this may require running new electrical, consult local electrical codes (NEC) and consider hiring a licensed electrician if the work involves opening walls or connecting to existing circuits.
Finally, don’t skip the finish work. Fill screw holes with wood filler, sand rough edges, caulk gaps between shelves and walls, and apply a final coat of paint or stain. The difference between a DIY project that looks homemade and one that looks custom often comes down to those last 10% details.