Table of Contents
ToggleBuilding a luxury wine cellar isn’t just about storing bottles, it’s about creating a space that rivals the finest tasting rooms in Napa. Whether you’re converting a basement corner or claiming an entire room, a well-designed wine cellar protects your investment while adding serious resale value. This guide walks through the critical decisions that separate a glorified closet from a true collector’s space: climate control that actually works, materials that age gracefully, and storage systems that showcase your collection without turning bottles into expensive vinegar. Expect honest talk about what requires a licensed contractor, what you can tackle yourself, and where cutting corners will cost you later.
Key Takeaways
- A true luxury wine cellar design requires precision climate control maintaining 55°F (±2°F) and 60-70% humidity, custom millwork, and thoughtful display elements that transform storage into a museum-quality exhibition.
- Budget $15,000–$50,000+ for a high-end wine cellar, with most costs going toward dedicated cooling systems and custom racking rather than DIY shortcuts that can ruin your collection.
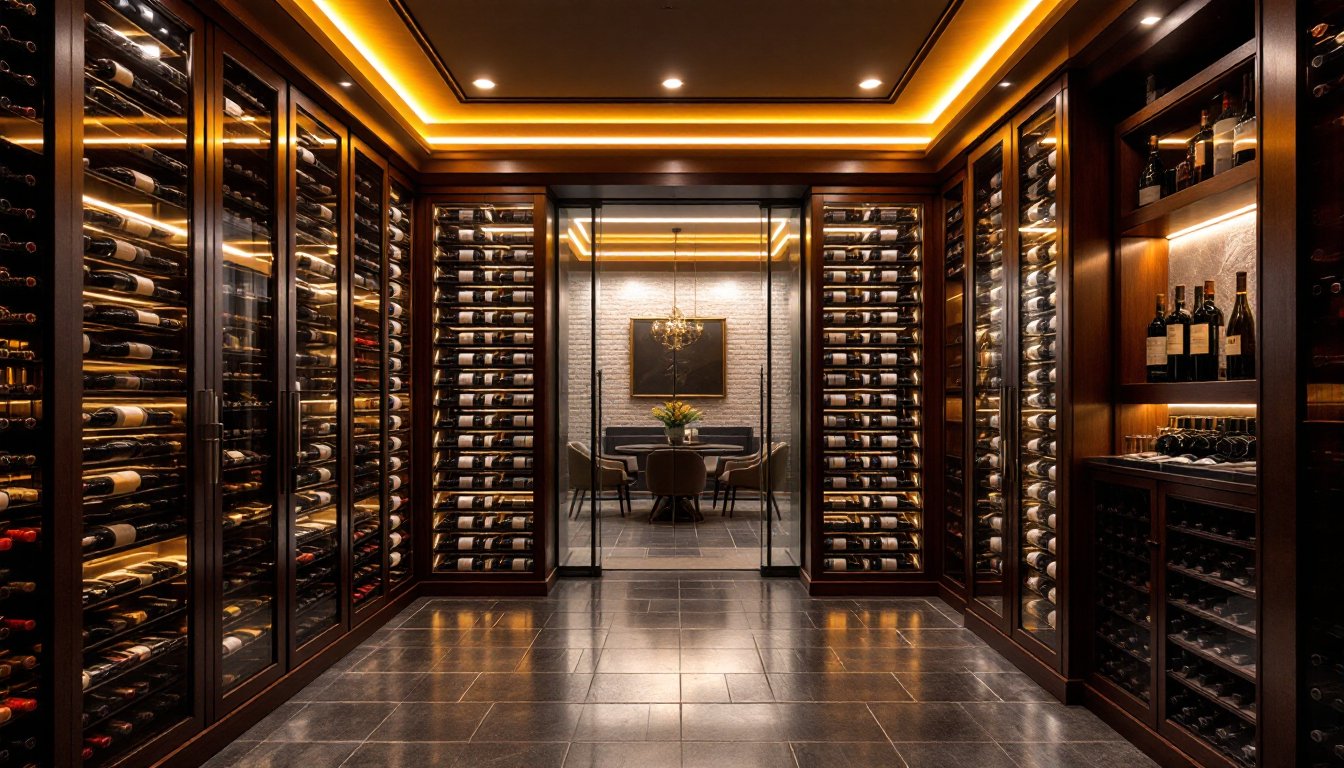
- Install LED lighting with minimal heat output and dimmers for display purposes, avoiding incandescent and halogen bulbs that generate infrared heat and fight your cooling system.
- Choose moisture-resistant materials like all-heart redwood or mahogany for racking, porcelain tile or sealed stone for flooring, and ensure proper R-19 insulation with vapor barriers to prevent condensation.
- Select a basement location whenever possible to reduce cooling demands, avoid exterior walls and heat sources, and anchor racking systems securely to wall studs for a permanent, built-in luxury aesthetic.
- Plan individual bottle racking at eye level for prized bottles and mix in diamond bins or bulk storage below for everyday wine, allowing 30-50% growth capacity as collectors expand their selections over time.
What Makes a Wine Cellar Truly Luxurious?
A luxury wine cellar goes beyond function, it’s a statement space that balances preservation science with architectural drama. The difference between a utility storage room and a luxury installation comes down to three factors: precision climate control that maintains 55°F (±2°F) and 60-70% humidity year-round, custom millwork or architectural finishes that feel permanent rather than retrofitted, and thoughtful design that makes the collection itself the focal point.
High-end cellars often incorporate viewing elements, glass walls, interior windows, or dedicated tasting areas, that turn wine storage into a living display. Think less “basement shelf” and more “museum-quality exhibition.” The luxury market also expects integrated technology: digital inventory systems, app-controlled climate monitoring, and security features that protect collections worth five or six figures.
Be realistic about scope. A true luxury cellar isn’t a weekend project. Plan for $15,000–$50,000+ depending on size, location, and finishes, with most of that budget going toward climate control and custom racking. If your space involves structural changes, HVAC integration, or electrical upgrades, you’ll need permits and licensed trades. This is not the place to DIY your way through mechanical systems, temperature swings ruin wine faster than almost any other mistake.
Essential Elements of High-End Wine Cellar Design
Climate Control and Temperature Management Systems
Wine requires stable, cool conditions. A standard HVAC system won’t cut it, wine cellars need dedicated cooling units designed to handle the specific thermal load and humidity requirements. Self-contained systems (like those from WhisperKOOL or CellarPro) work for smaller cellars (up to 1,000 cubic feet), while split systems, with the condenser outside the cellar, handle larger spaces and run quieter.
Insulation is non-negotiable. Cellar walls should have R-19 insulation minimum, with a proper vapor barrier on the warm side to prevent condensation inside the wall cavity. The door must be exterior-grade with weatherstripping, an interior passage door will leak conditioned air and overwork your cooling system. Many professionals retrofit modern luxury homes to incorporate wine cellars with dedicated HVAC zones.
Installation requires careful electrical planning. Most cooling units pull 15-20 amps and need a dedicated circuit. If you’re working in an existing space, budget for an electrician to run new wiring. Don’t undersize the unit, calculate your cellar’s cubic footage, account for glass walls (which increase thermal load), and choose a unit rated for 25% more capacity than your math suggests. Oversizing slightly extends compressor life and improves humidity control.
Sophisticated Lighting Design for Display and Preservation
Lighting must look spectacular while protecting wine from UV damage. LED strips have revolutionized cellar lighting, they produce minimal heat, offer excellent color rendering, and can be dimmed or color-tuned. Install them behind crown molding, under shelves, or integrated into racking uprights for a floating-bottle effect.
Avoid incandescent and halogen bulbs, they generate heat that fights your cooling system. If you want ambient lighting, use 3000K LEDs for warm tones that complement wood finishes without the infrared heat. For dramatic effect, backlight translucent stone (onyx, alabaster) or install LED panels behind acrylic display sections, similar to featured luxury wine installations.
Control systems matter. Install dimmers or smart switches so you’re not blasting full light every time you grab a bottle. Motion sensors work well for entry lighting, but keep display lighting on manual control, you want it on when entertaining, off when storing. Avoid any fixtures that mount directly to racking, which creates vibration when doors open or close.
Premium Materials and Finishes for Your Wine Cellar
Material choice defines the cellar’s character. Mahogany and redwood dominate high-end installations for their natural resistance to moisture and insects, plus rich color that deepens with age. Redwood, specifically all-heart grade, never needs staining, its natural tannins resist mold in humid environments. Mahogany offers tighter grain and takes stain beautifully if you want a darker, Old World look.
For a modern aesthetic, designers increasingly use metal and acrylic racking systems. Powder-coated aluminum or stainless steel provides clean lines and works especially well in contemporary homes with glass-walled cellars. Acrylic pegs or rods create a floating-bottle illusion that’s visually stunning but requires precise engineering, the support structure must handle significant weight (750ml bottles weigh about 3 pounds each).
Flooring needs to handle humidity without warping. Skip laminate and standard hardwood. Porcelain tile, engineered for moisture areas, gives you the look of stone, wood, or concrete without the maintenance headaches. If you want authentic stone, slate or travertine work well, though they require sealing. Cork flooring is another option, it’s naturally antimicrobial, comfortable underfoot, and handles temperature swings well.
Walls set the tone. Exposed brick or stone veneer adds old-cellar romance. Shiplap or tongue-and-groove paneling in matching wood species creates a cohesive, finished look. Whatever you choose, ensure it’s installed over proper insulation and vapor barrier. Many upscale interior projects feature textured wall treatments that add depth without sacrificing climate control.
Choosing the Perfect Location in Your Home
Location dictates half your design challenges. Basements are the default choice, naturally cooler, away from living noise, and often have unused space. Below-grade locations require less aggressive cooling, cutting long-term energy costs. Check for moisture intrusion first. Any basement with a history of seepage needs waterproofing before you invest in millwork and bottles.
Under-staircase conversions work for smaller collections (200-500 bottles) and create dramatic visual impact in open floor plans. You’ll need to insulate and seal the space completely, which means closing off what’s often open framing. This requires drywall, insulation, and a custom door, budget accordingly. Cooling these spaces is trickier because they’re surrounded by conditioned living areas: the thermal gradient isn’t in your favor.
Climate-controlled closets or spare rooms on main floors are doable but fight your HVAC system. The cooling unit will run constantly if the room isn’t well-insulated from the rest of the house. This approach works best in moderate climates where you’re not battling extreme heat or humidity. You’ll also hear the cooling unit more, factor in noise when choosing equipment.
Avoid exterior walls if possible, they increase thermal load. If your only option involves an exterior wall, go heavy on insulation (R-30 or better) and consider rigid foam board on the interior before framing. Never locate a cellar near heat sources (furnaces, water heaters, kitchens) or in spaces with plumbing overhead, a leak will devastate your collection and finishes.
Wine Storage Solutions: Racking Systems and Display Options
Racking is where form meets function. Individual bottle racking is the gold standard for collectors, each bottle sits in its own cradle, label forward, easy to access. Standard openings are 3.75 inches wide by 3.75 inches deep for Bordeaux-style bottles, though you’ll want larger openings (4.5 inches) if you collect Pinot Noir or Champagne.
Diamond bins create visual interest and work well for multiples of the same vintage, you’re storing cases, not curating individual selections. They waste less space than individual slots but make inventory management harder. Many luxury cellars mix systems: individual racking at eye level for prized bottles, diamond bins below for everyday wine, and bulk storage (wooden cases or bins) at floor level for long-term aging.
Display rows with deeper cubbies showcase special bottles or larger formats (magnums, double magnums). Plan these sections early, they require different depth (8-12 inches) and structural support. If you’re going custom, have the millworker build a few presentation niches with backlighting for your trophy bottles.
Capacity planning: A standard 750ml bottle is roughly 12 inches tall and 3 inches in diameter. Calculate your racking based on current collection size plus 30-50% growth room, collectors always underestimate future purchases. Most custom racking is built in modular sections (30-36 inches wide), making it easier to expand or reconfigure later.
Installation matters. Racking must be anchored to wall studs, especially floor-to-ceiling systems that hold hundreds of pounds when loaded. Use #10 wood screws, 3 inches minimum into studs, or toggle bolts rated for the load if you’re working with metal studs. Freestanding systems work for smaller capacities but feel less permanent and can’t achieve the built-in look that defines luxury installations.